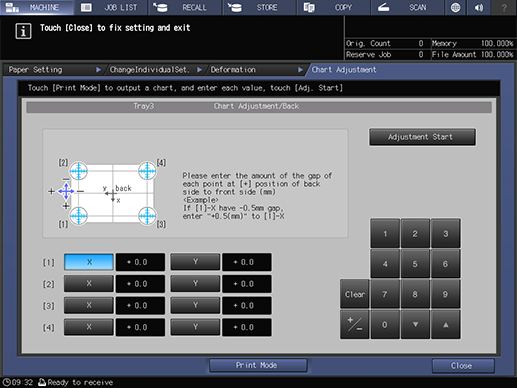
[Chart Adjustment] ([Deformation])
Overview
A chart is prepared to adjust [Deformation].
Measure the measurement points of the output chart using a scale, and perform the adjustment by entering the measurement value.
This adjustment is useful for 2-sided printing with a new paper type, or when the amount of misalignment between both sides is unknown after changing the paper in the paper tray, because the position of both sides can be adjusted by just entering measurement values.
Specifications
Category | Copy / Scan | ||
Location | Machine | Touch Panel | |
Printer driver | - | ||
Application | - | ||
Required options | - | ||
Required items | Scale | ||
Setting items | [Adjustment Start] | Adjusts to the entered numeric value and moves to the previous screen. | |
[X] | Enter the misalignment between " | ||
[Y] | |||
Keypad | Used to enter numeric values. | ||
[Clear] | Returns the entered numeric value to "0". | ||
[,] / [+] | Increases or decreases the numeric value in 0.1 increments. | ||
[Print Mode] | Outputs a chart for measurement. | ||
Remarks | Marks are printed on the front side of the chart. Marks are not printed on the chart printed by front chart adjustment. For details about the marks on the chart, refer to About Charts. | ||
Reference | - | ||
Screen access | Touch panel - [MACHINE] - [Both Sides] - [Deformation] | ||
Touch panel - [MACHINE] - [Paper Setting] - [New Setting] - [Both Sides Adj.] - [Deformation] | |||
Touch panel - [MACHINE] - [Paper Setting] - [Change Set] - [Both Sides Adj.] - [Deformation] | |||
Touch panel - [MACHINE] - [Reg./Del.PaperSet.] - [Add/Edit] - [Both Sides Adj.] - [Deformation] | |||
Procedure
The [Chart Adjustment/Back] screen is displayed.


A test chart is output.
 " of [1] to [4] on the back side and "
 " on the front side of the chart.
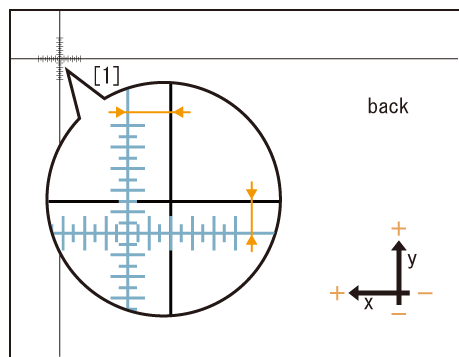
The figure shows an example where [1] is measured. The scale resolution is 0.5 mm.
The black " " in the figure indicates the front side, and the blue "
 " indicates the back side.
You can enter units of up to 0.1 mm.

The figure in step 4 shows the " " of [1] misaligned with the front side by 2.0 mm on the plus side of the X-axis, and by 1.5 mm on the minus side of the Y-axis. In this case, for [1], you want to move the blue line of the back side by 2.0 mm in the minus direction on the X-axis, and by 1.5 mm in the plus direction on the Y-axis. This can be compensated by entering 20 for X and pressing [+ / -], and entering 15 for Y.
 in the upper-right of a page, it turns into
  and is registered as a bookmark.