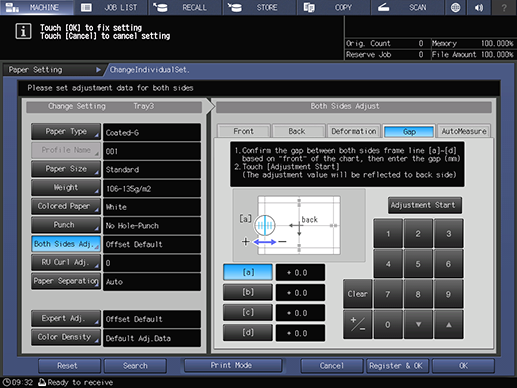
[Gap]
Overview
Simply adjust only the magnification and image position of the back side based on the image position of the front side.
This is useful for 2-sided printing with a new paper type, or when the amount of misalignment between both sides is unknown after changing the paper in the paper tray, because adjustment can be performed by just entering the adjustment value.
Specifications
Category | Copy / Scan | ||
Location | Machine | Touch Panel | |
Printer driver | - | ||
Application | - | ||
Required options | - | ||
Required items | Scale | ||
Setting items | [Adjustment Start] | Starts adjusting a misalignment between the front and back sides. | |
[[a]] | Select the measurement point of the chart to enter numeric values. | ||
[[b]] | |||
[[c]] | |||
[[d]] | |||
Keypad | Used to enter numeric values. | ||
[Clear] | Returns the entered numeric value to "0". | ||
[,] / [+] | Increases or decreases the numeric value in 0.1 increments. | ||
[Print Mode] | Outputs a chart for measurement. | ||
Remarks | - | ||
Reference | - | ||
Screen access | Touch panel - [MACHINE] - [Paper Setting] - [Change Set] - [Both Sides Adj.] - [Gap] | ||
Touch panel - [MACHINE] - [Paper Setting] - [New Setting] - [Both Sides Adj.] - [Gap] | |||
Touch panel - [MACHINE] - [Both Sides] - [Gap] | |||
Procedure
A test chart is output.

The figure shows an example where [a] is measured. The scale resolution is 0.5 mm.
The black lines in the figure indicate the front side and the blue lines indicate the back side.
You can enter units of up to 1 mm.


When the scale of [a] is misaligned with the front side by 1.5 mm on the plus side of the Y-axis, as shown in the figure in step 3, enter 15 and press [+ / -] to move the blue line on the back side by 1.5 mm in the minus direction.
If the print position is misaligned in the minus direction, enter a positive value. If it is misaligned in the plus direction, enter a negative value.
Use [+ / -] to select the positive or negative value.

A test chart is output.
Repeat steps 1 to 4 until the front and back are aligned.
 in the upper-right of a page, it turns into
  and is registered as a bookmark.