Pre-registration Adj.
Adjust the paper loop amount in pre-registration roller section of the trays. This adjustment is required when the printed paper shows skew or wrinkles or when a paper jam occurs in the registration roller section.
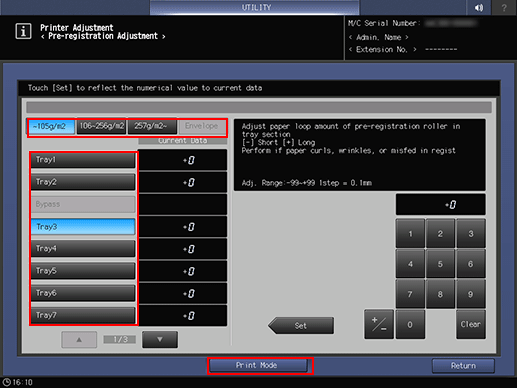
When Paper Feed Unit PF-707m, Large Capacity Unit LU-202XLm, or Multi Bypass Tray MB-508 is mounted on the machine, if Tray3 to Tray11 or Bypass is selected, adjustments can be made for each paper weight. Also, to make adjustments for each paper weight, select 1st PFU Connecting Part, 2nd PFU Connecting Part, Bypass Connecting Part, or Tray6 Connecting Part when Paper Feed Unit PF-707m is mounted in 2-unit connection or 3-unit connection mode or when Paper Feed Unit PF-707m is equipped with Large Capacity Unit LU-202XLm, Multi Bypass Tray MB-508, or both.
Objects of adjustment: Tray1 to Tray11, Bypass, ADU Large Size, ADU Small Size, ADU Width 150mm or Less, 1st PFU Connecting Part, 2nd PFU Connecting Part, Bypass Connecting Part, Tray6 Connecting Part
Objects of adjustment: ~ 105g/m2, 106 ~ 256g/m2, 257g/m2 ~, Envelope
Adjustment Range: -99 (Short) to +99 (Long) (1 step = 0.1 mm)
Follow the procedure on Displaying the [Administrator Setting Menu] Screen to display the Administrator Setting Menu screen.
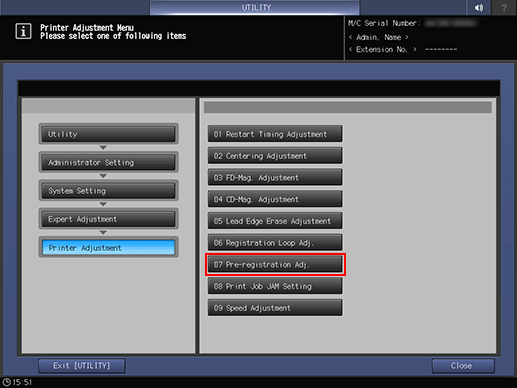
Press System Setting on the Administrator Setting Menu screen, and then press Expert Adjustment, Printer Adjustment, and Pre-registration Adj. in sequence.

The Pre-registration Adjustment screen is displayed.
Press the key of the item to be adjusted.

Press Print Mode.
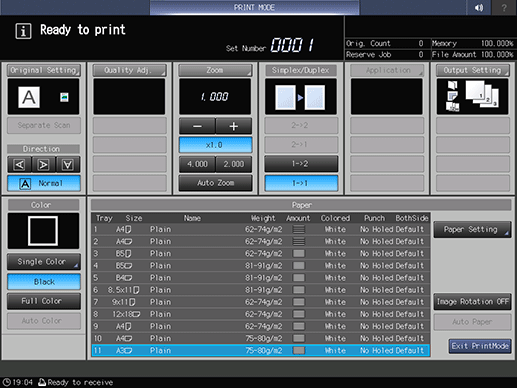
The PRINT MODE screen is displayed.
Set A3 short edge feed or 11 17 short edge feed paper into the tray to be adjusted, select that tray and then press Start on the control panel.

A sample pattern will be output.
Check the sample pattern.
If any adjustment is required, press Exit PrintMode to return to the Pre-registration Adjustment screen.
Use the touch panel keypad or the keypad on the control panel to enter the setting data.
supplementary explanationUse +/- to specify the value to be positive or negative.
supplementary explanationPress Set to change the Current Value.
Repeat steps 4 to 8 until the desired result is obtained.
Press Return to return to the Printer Adjustment Menu screen.